Hi! My name is Juha Kuusama. All of my career, I have been an electronics product developer, most of the time on audio products. My main job is at Kuusama Audio Oy, designing high-end HiFi and home theater audio products.
Recently, I purchased equipment for my company to be able to assemble SMD circuit boards in house. That would vastly speed up the development process, not to mention saving the cost of outsourcing the assembly. I only needed the equipment for prototypes – I don’t think I would be doing more than one or two boards at the time, and I’m doing only a few new designs in a year. So, I bought about the cheapest and simplest tools there are: manual paste dispensing with a steel squeegee, a manual vacuum pick-up tool with a foot switch and a desktop grill oven with a automatic controller. Total cost was only about 300€(!), as I already had a microscope. (There is no affiliation to the products linked, other than a satisfied customer.)
I was delighted how easy the system was to set up. A couple of hours tweaking the profile on the controller, and I had the oven following the paste manufacturer’s recommended temperature profile more or less perfectly. A couple of practice runs of paste dispensing and I was ready to do the first real board.
Using a steel stencil, paste dispensing gave great results. (See the video in the first link to see how to do that – very easy!) And reflow soldering result was faultless, too. That was expected – remember, the temperature profile was correct. I was ecstatic about the easiness of these stages, too. Paste dispensing was only a couple of minutes, including the time cleaning the stencil afterwards. Soldering happened automatically with one press of a button. This is how prototypes should be built!
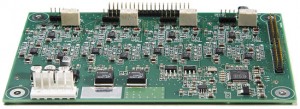
Except the stage in between! Oh my. This was the board, an ESS SABRE32 Reference 32-bit DAC module:
 Doesn’t look like much, but there are 450 SMD parts on it. Even with a good vacuum pick-up tool, that took about three hours. I was able to do it, but it was more of a hero story than how this should be done. My hand started shaking after the first hour, with two to go. Do note that after putting down the soldering paste, you only have a few hours to place the parts. I did manage to finish the placement before the paste went bad; it wasn’t that good towards the end, but fortunately, the result was great, except my hurting neck. But no, this is definitely not how this job should be done! No way I wanted to go through that again.
So, I started to look for a pick and place machine for prototype assembly. I am very familiar with real, production equipment, but those cost tens of thousands and need much more room than I could make available. Certainly something simpler would exist; I couldn’t be the only one wanting to do SMD prototypes in-house. To my surprise, I couldn’t find anything. I couldn’t believe it. There were some aids to support the hand on manual placement and used machines ranging from 10k an up, but nothing automatic and affordable. Especially, there was nothing aimed for prototyping and the special requirements of a prototype assembly.
On the other hand, I had been looking at low cost entry level CNC machines, such as the Shapeoko. With similar technology, building a pick and place machine can’t be that difficult, couldn’t it, especially for a seasoned product developer who knows what a prototype builder really needs*? And so, the LitePlacer project started.
*: I suspected from the beginning that I could be wrong… One of these days, I’m going to write about that!