The area on bottom of the LitePlacer software window stays the same, regardless of the selected software page. On bottom left, there is the log window. Normally, this is not of interest. In some cases, messages or measurement results are printed there. The image below show the bottom right corner of the software window:
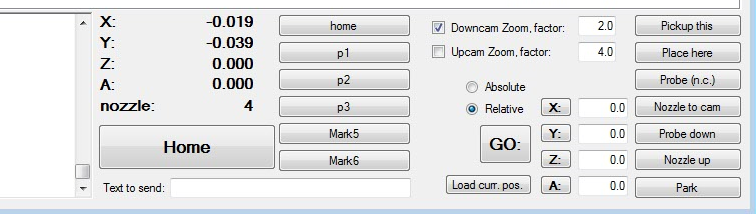
Starting from the left in this image, there is the edge of the log window. Right from that is a coordinate display, showing the current machine position and the nozzle currently loaded. The big “Home” button homes the machine, getting accurate reference position using the vision system, homing on the mark you put on the table. The button is red when the machine knows that the physical location of the machine does not correspond to the displayed coordinates (at start if homing is skipped, error conditions, motor power timed out).
The “Text to send” box sends the text directly to TinyG. In normal use this is not needed. The command $$ dumps the TinyG settings in human readable form to the log window; this is sometimes useful in troubleshooting.
Next are six bookmark buttons (here, “home”, “p1”, “p2” …). These take the machine to pre-set and named positions. These positions and their names are set in the basic setup page.
The “DownCam Zoom” and “UpcamZoom” check boxes turn zoom on for the camera displays and in the “factor” text box, you can set the zoom amount.
Below these is the location setting section. There is selection for Absolute/Relative. When Absolute is selected, the machine uses the coordinates set in the text boxes directly, moving it to a precise location. With Relative set, the machine moves a set amount from the current position. The “Go” button uses all the coordinates set in the boxes. For individual axes, use the individual buttons. The “Load curr. pos.” button puts the current machine location to the text boxes.
The low right corner buttons are:
“Pickup this” picks up the part from the current position. Please note, that the current position is defined as the location shown on down camera. The machine moves the nozzle to this location using nozzle correction (assuming “using correction” is set, see Run job page for the description) and picks up the part.
Similarly, “Place here” puts the part down to the current location (shown in the camera view in most cases).
For troubleshooting, the “Probe (n.c.)” takes the needle down to the current location, without using nozzle calibration data. The “Probe down” button does the same, but with nozzle calibration data.
“Nozzle to cam” button takes the nozzle over the up camera. You should be on the Up camera setup tab for this. When you click “needle down” there, the nozzle should end up precisely in the middle of the camera view. Do not probe down to the camera, use the correct button! [When writing this I realize this is not the most logical or even a good place for this button. I will fix this, but this is how it is today.]
“Nozzle up” takes the nozzle up, just like it says. 🙂
Finally, the “Park” button takes the machine to an “out of the way” position. This position is set on the basic setup page.