Connect to camera
Select the Up Looking Camera tab. Note, that the camera used does not automatically change, and the camera used is not automatically activated (this is because otherwise, solving problems would be difficult in some cases). Select camera from the selection box and click select. If needed, repeat until image from the up looking camera appears.
Although the USB cameras have the same name, the program does recognize and remember which one is which. Go back to down looking camera tab, and press Select without changing the selected camera in the selection box. The image should change correctly to the down looking camera. Come back the up looking tab and select this camera again.
Alignment screws
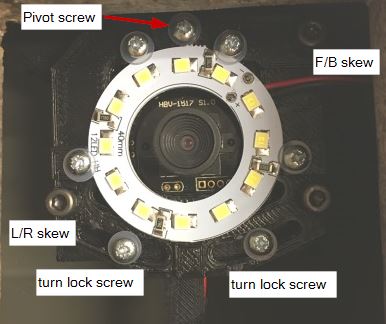
Here is an image of the alignment screw on the up cam module:
Align the Camera, Set the Image Size
Place a ruler above the camera so, that its edge aligns to the middle of the image. Go back to down looking camera tab and align the ruler with the cross (machine X axis). With the help of this ruler, adjust the alignment of the up-looking camera. With a small screwdriver, tighten the turn lock screws first, and the pivot screw last.
Like you did with the down camera, use a mirror to adjust the skew of the up looking camera. Use a 4mm hex key to adjust the L/R (left/right) and F/B (front/back) skew bolts. Leave the thrid bolt alone. This might be awkward, sorry about this. For inspiration, this is how I did it on my machine:
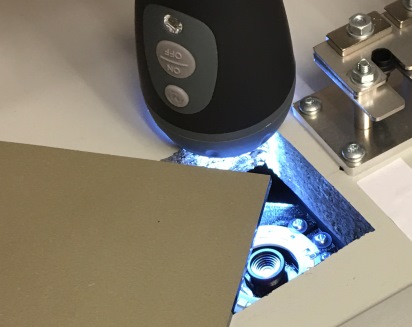
I used a corner of a mirror to get access to the adjustment screws. I turned the power off so that the light reflection from the mirror did not blind the camera. Finally, in my low lit basement lab, I used a flashlight to get some light in the hole. This is what I saw:

Blurry and somewhat difficult to adjust, but gets it done. (It is not quite right yet in the above image, as you can hopefully see.)
Once satisfied, measure the box size just like with up looking camera, and put the values to the boxes. For maximum accuracy, have an empty PCB under your ruler, so that the measurement is done at PCB surface height.
Once you are happy with the camera tuning, add a light diffuser: Take the supplied diffuser material sheet and cut a hole to it. This hole should be at least the size of the biggest nozzle. However, it is planned to have a software upgrade to align parts on the nozzle; to be prepared for this, the hole could be the size of the largest part you are going to use. Tape the diffuser on the table so that it doesn’t interfere with the camera image, with “Show pixels” off.
How to switch between cameras, troubleshooting
There are three methods for selecting between the cameras, in the preferred order. Select the Keep Active box and try a few times switching between the tabs and clicking select. If there are any issues, keep reading:
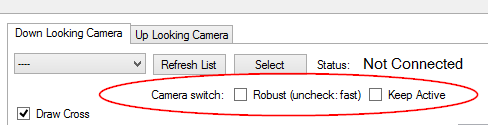
Keep Active: Tries to start two camera streams and keeps both active. Switching the active video stream is handled inside LitePlacer software. This consumes more USB bandwidth, but is the fastest method, if your system supports it.
Fast: Does activate/deactivate cameras, doing it efficiently (but see below). Activate this method by unselecting “Robust” checkbox.
Robust: Does activate/deactivate cameras, using a slower but supposedly, more robust method.
Troubleshooting tips:
Some machines have had issues on selecting between the cameras. Things that have helped:
- Connecting cameras directly to a computer (not through a hub)
- Connecting cameras to different USB ports, so that they are using different USB controller chip inside the machine
- A tip from a customer: “Solved it; went into device manager, selected one of the cameras and clicked “Update driver” then selected to browse manually for a driver and continued to select from a list of devices, selected “Imaging devices” -> Microsoft -> USB Video camera.”
- Make sure the selected cameras point to different physical devices. This is a bit awkward as the cameras are identical (except for a cryptic individual string), so they have the same USB device name. The easy way to tell the camera devices is the order where they are on the list; makes sure you select the upper in the list for one camera and the lower for another. If you doubt this might be the issue, pay attention to the cryptic strings shown in the log window.
- The OpenPnP folks have encountered similar issues with USB and cameras than some LitePlacer users. Jason von Nieda, the guy behind OpenPnP, has written a good page about the issue: https://github.com/openpnp/openpnp/wiki/USB-Camera-Troubleshooting-FAQ.
- Also, this thread has good hints and a link to a tool that might help in diagnostics:
https://groups.google.com/forum/#!topic/openpnp/17d9WNn3DhY.